Hiển thị các bài đăng có nhãn ERecipes. Hiển thị tất cả bài đăng

Thứ Năm, 19 tháng 6, 2014

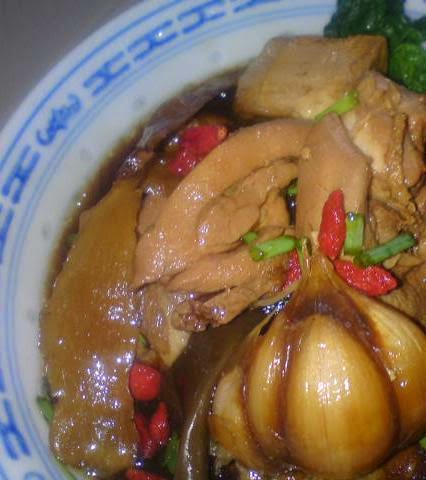
Bak Kut Teh Flavour Chicken Soup

This is a thick version of the Bak Kut Teh soup.  I used the Klang Bak Kut Teh herbal ingredients [from Sonia's recipe here].  Instead of cooking it with 2.5 litres water, I reduced it to only 1 litre and changed the pork ingredients to chicken.  I added tofu puffs, firm beancurd, black fungus and mushrooms.
The soup has a strong herbal flavour which had infused into all the other ingredients.  My family like this intense herbal taste.  If you think it is too much of herbal ingredients needed, just use 1-2 sachets of BKT to cook this dish.
Ingredients
[serves 3-4]
2 big chicken thighs - skin removed [about 400 gm] - cut bite size pieces
1 firm beancurd - cut wedges and fried
10 tofu puffs
2-3 dried mushrooms - soaked and quartered
1 piece wood ear fungus - soaked and cut into pieces
1 bulb garlic or  roasted whole garlic 黑蒜头
2 tbsp light soy sauce
1 tbsp dark soy sauce
salt to taste
1 tbsp Wolfberries/Goji 枸杞
Herbal Soup Ingredients
3 sticks tong sum 党参
1 piece cinnamon stick 
2 pieces bay leaves
1 piece Chen Pi [dried tangerine peel] 陳皮 
30 gm Yok Chok 玉竹
2 sticks Gan Chao甘草 
3 slices Chuan Xiong 川芎
1 piece Shu Di 熟地 
1 stick Niu Qi  牛七
6 slices Dong Gui 当归
1/2 tsp white peppercorns 白楜椒
1/2 tsp black peppercorns 黑楜椒
1/2 tsp hua jiao 花椒
1/2 tsp fennel seeds 小茴香
1 honey date 蜜枣
1 star anise
1 litre water

  1. Rinse herbs.  Bring water to boil and add in the herbal soup ingredients.  Boil for 15-20 minutes or until the soup is fragrant.  
  2. Strain the liquid into a claypot or soup pot.  Bring to boil, add in garlic, black fungus and mushrooms.   Boil for several minutes.
  3. Add in chicken, tofu puffs and fried beancurd wedges.  Bring to a boil again and lower heat to simmer until chicken is tender.
  4. Lastly add wolfberries and seasoning to taste.  Serve hot with rice.

Thứ Tư, 18 tháng 6, 2014

Nori Layered Cake

 
Look at this cake.  I have never been more satisfied about baking cakes than this one.  Sounds odd placing a whole piece of Nori sheet in between the cake batter but it's really unique, taste and texture wise.
Out of curiosity, I baked this cake as I have several sheets of Nori seaweed leftover from making Sushi.  You can omit the green colour for one layer and use the plain colour for all the layers with the same batter.  I use thin coconut milk to replace water since there is salt in this cake recipe.  Taste good.
Texture - light, soft, moist and fluffy.
Taste - savoury sweet, has the aroma of the Nori seaweed and coconut milk
Verdict - very nice cake, my hubby gave a thumbs up and of course, a portion of it is on the way to my mother in-law.
Recipe Source - Yum Yum Magazine No. 90
Ingredients
[use 7" loose bottom square tin]
5 egg yolks 
20 gm castor sugar
100 ml water [I used thin coconut milk - dissolve 2 tbsp coconut milk powder to water]
120 gm plain flour
1/2 tsp salt
80 gm melted butter
5 egg whites
1/4 tsp cream of tartar
40 gm castor sugar
2 pieces of nori sheets [7" square piece]
  1. Line the base of baking tin with parchment paper and lightly greased the sides.  Preheat oven at 140 degrees C.
  2. Combine egg yolks and sugar, mix well then stir in water [thin coconut milk].
  3. Fold in sifted flour and salt.  Mix well and stir in melted butter.
  4. Whisk egg whites until stiff peak.  Add to egg yolk batter in 3 batches.  Mix lightly with a spatula.  Divide into 3 portions.  I coloured 1 portion green, you can omit and keep the batter plain.
  5. Pour 1 portion batter into baking tin and place a piece of Nori sheet over batter.  Pour in the 2nd portion of batter and top with the Nori sheet.  Lastly, cover the Nori sheet with the remaining batter.  Shake the pan a little to smoothen the batter.
  6. Bake in oven at 140 degrees C for 40 minutes then increase the temperature to 160 degrees C, bake for a further 10-15 minutes [I baked the cake on lower temperature to prevent the cake from cracking]. The original recipe uses temperature of 180 degrees C with baking time of 25-30 minutes.
  7. Remove cake and drop baked cake in the pan from about 20 cm height onto the table top [this is to prevent the cake from shrinking too much upon cooling].
  8. Invert the cake to cool before removing from pan.
  9. Slice cake to serve.


I'm submitting this post to Little Thumbs Up June 2014 Event - Butter 
hosted by Jozelyn of Spice Up My Kitchen
Photobucket
I'm also sharing this post to Cook Your Books #13 Event hosted by 
Cook-Your-Books


Thứ Ba, 17 tháng 6, 2014

Soy Sauce Chicken Drumsticks [Si Yau Kai]

Another of my New Year 2014 resolution accomplished.  I promised to try the lovely recipes shared generously by many food bloggers.    This one is from The Fuss Free Chef.  Esther has posted this recipe which I have bookmarked to try. Recently, I did it but with some adjustments. I used chicken drumsticks and firm beancurd as I wasn't in the mood for too much meat for a weekend meal.
Verdict - Chicken meat is sweet and tasty.  The flesh isn't dry or overcooked eventhough it is simmered for 40 minutes.   Sauce is flavourful spread over rice.  My hubby gave a Thumbs Up for it and I am very happy seeing him enjoying this easy and simple to prepare meal.   It's a keeper then as I can make use of the remaining sauce to braise other ingredients like eggs, pork rolls, chicken wings or whole chicken and maybe tofu puffs.  Just top up with the braising ingredients again, I believe the sauce will get tastier each time.
Ingredients
[serves 3]
3 chicken Maryland [about 800 gm] - I used 3 drumsticks [about 600 gm]
3 pieces firm beancurd 
2 tsp each of oil and sesame oil
Dry Ingredients
5 cloves garlic - keep whole with skin
2 inch piece of ginger - lightly smashed
2 star anise
1 piece cinnamon stick [1.5 inch]
10 peppercorns
1 large piece dried orange peel
1 piece liqourice stick [ganchao]
2 stalks spring onions - cut 2-3 inches in length
Liquid Ingredients
100 - 120 ml light soy sauce [good quality]
1-2 tsp dark soy sauce
500 ml water
60 gm rock sugar
  1. Rinse chicken and leave skin on.
  2. Using a heavy based steel pot or non stick pot [I used a claypot, next time I'll use a bigger pot so that the chicken and beancurd can be fully immersed in the liquid without adding more water], heat the oils and gently fry the aromatics until fragrant.
  3. Pour in the liquid seasonings and bring to a boil.  Turn down the fire and let the sauce simmer gently for about 10 minutes - Important Step.
  4. Add chicken and beancurd - make sure the sauce completely covers the chicken [if insufficient, add more water and adjust the taste].  The sauce should be quite salty with a tinge of sweetness and fruity after taste.  Let it simmer as gently as possible for about 40 minutes.
  5. Test if chicken is done, remove and let it rest for about 15 minutes [I left the chicken and beancurd in the liquid until serving time].
  6. Serve chicken as whole piece or sliced with rice and cucumber and tomato slices and more shredded spring onions.
Aren't this Yummy-licious?
Thanks to Esther for sharing this simple, easy Si Yau Kai recipe.

Thứ Hai, 16 tháng 6, 2014

Baked Ji Dan Gao (烤鸡蛋糕)

Personally, I don't fancy egg cakes [steamed] cos' of the eggy taste. Recently, there were quite a number of the baked version appearing in FB and blogs. The cakes looks good especially the cocoa marble designs. I have earlier bookmarked Eileen's recipe but didn't get down to do until I saw Ann, Jeannie and Zoe's posts on the Baked Ji Dan Gao.
Visit this site for Its' Nutrition Facts
This baked Ji Dan Gao tasted good and texture wise was perfect. It tasted even better the next day. 
But my cake shrink a little, something may have gone wrong.  I appreciate very much Zoe, Jeannie and Ann's advices on the possible causes of why the cake shrink after cooling.  I'll take note of it.  Maybe I'm not skillful in the mixing process. Anyway, this is a nice cake, light and soft which I'll be baking again.  From the photos, is the shrinkage noticeable?  The crack is not that obvious, though.
Recipe Source - Anncoo Journal
Ingredients 
[6 inch square pan - lined with parchment paper]
65 gm self raising flour - sifted
5 gm cocoa powder mix with 1 tbsp hot water into a paste
3 egg yolks 
1 whole egg
50 ml corn oil
3 egg whites
65 gm icing sugar


  1. In a mixing bowl, whisk egg yolks and whole egg.  Add in corn oil.  Mix well.  Add in sifted flour and mix well [ the batter is thick].
  2. Whisk egg whites to bubbly on medium speed and add icing sugar into it in 3 batches.  Whisk until stiff peaks formed.
  3. Add 1/3 of meringue into egg yolk mixture, fold until batter is smooth.  Then pour this mixture into balance meringue.  Whisk at low speed to mix well.
  4. Pour mixture into prepared cake tin [leaving 2 tablespoon plain mixture and mix it with cocoa paste].
  5. Drizzle the cocoa mixture on top of the plain batter.  Use a skewer to draw lines to create your own pattern.
  6. Bake in preheated oven at 170 degrees C for 35 minutes {i'll try baking at 140 degrees C for 25 minutes then at 160 degrees C for 15 minutes].
  7. Remove cake and invert immediately to cool on wire rack.
  8. Leave to cool before slicing to serve.